Indice dei contenuti
Toggle
In an era where home security is more critical than ever, setting up a reliable NVR camera system with outdoor 4K CCTV cameras can provide unparalleled peace of mind. These systems combine crystal-clear imaging with advanced features like motion detection, infrared night vision, and remote monitoring to ensure your home stays safe.
Whether you’re a tech enthusiast or a beginner, this guide will take you step-by-step through the process of configuring your system, making it operational, and unlocking its full potential. By the end, you’ll have a system that not only protects your home but also offers unmatched convenience.

Step 1: Understanding the Components
To set up your NVR system effectively, it is essential to first understand the components you’re working with. A typical NVR system includes the NVR unit, 4K outdoor CCTV cameras, Ethernet cables, and supporting accessories like a power supply and a mouse. The NVR acts as the command centre, recording and storing video footage captured by the cameras.
High-definition cameras offer features such as Power over Ethernet (PoE) for simplified installation and ultra-clear resolution for detailed monitoring. Additionally, modern NVR systems often support remote access, allowing you to manage your security setup via a smartphone app or PC client. Systems like LS VISION even provide weatherproof cameras rated IP66, making them perfect for outdoor use under any conditions, from rain to extreme heat.
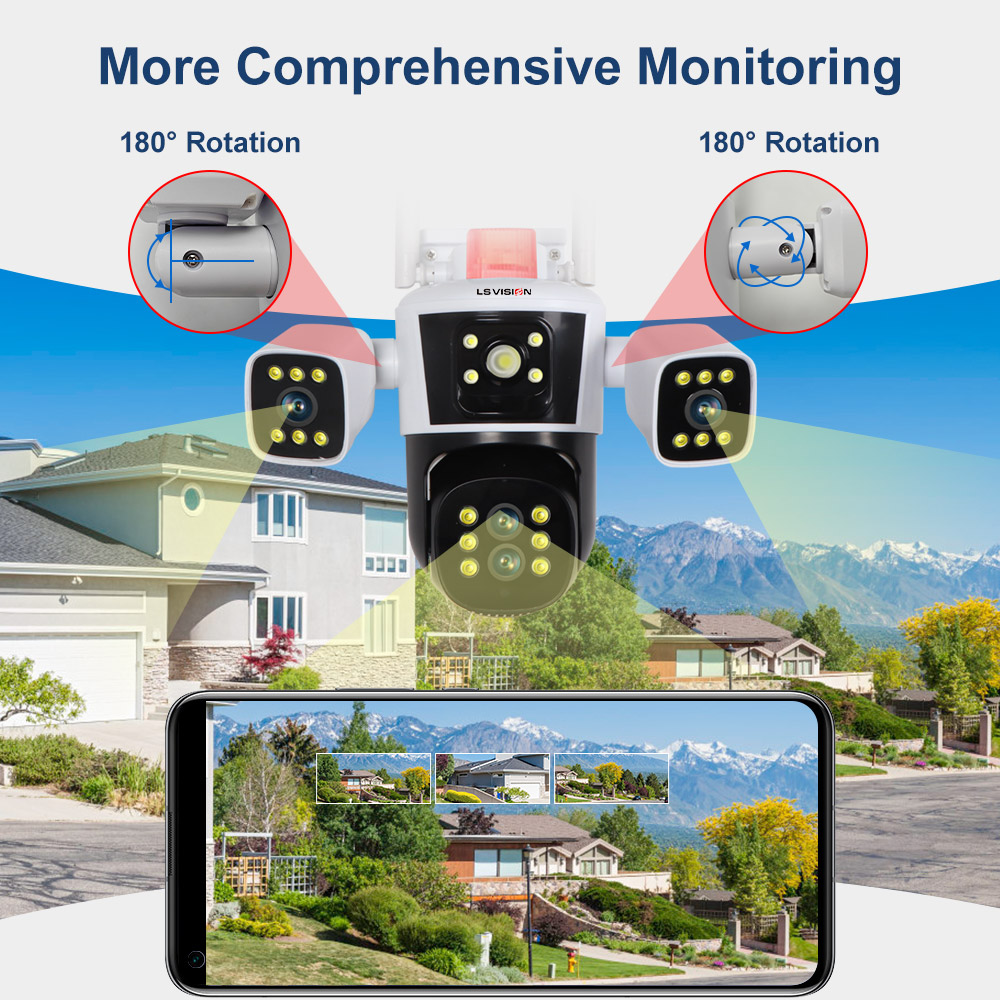
Step 2: Planning Camera Placement
Strategic placement is crucial for maximizing your camera system’s effectiveness. Begin by identifying key areas around your property that require monitoring, such as entrances, driveways, and open spaces like backyards. Ensure cameras are installed at a height that deters tampering but still provides a clear view of the area.
Consider the field of view for each camera and the type of lens it uses, such as optical zoom lenses, which allow for focusing on distant objects without losing image quality. Planning ensures you cover blind spots and create a comprehensive security net. Moreover, keep in mind environmental factors like lighting, obstacles, and potential reflective surfaces that may affect the camera’s performance, especially at night.
Step 3: Mounting and Connecting the Cameras
Once you’ve determined the ideal locations, securely mount your cameras using the provided brackets and screws. Carefully position them to cover the intended areas, considering features like night vision that might require adjustments in low-light environments. Connect the cameras to your NVR using PoE cables, which conveniently supply both power and data through a single connection.
Systems like LS VISION come equipped with robust infrared night vision, ensuring clear visuals even in complete darkness. Before finalizing the installation, test the video feed to ensure the camera angles are correctly aligned and that there are no obstructions. This initial check can save significant time and effort later by addressing issues before permanent installation.
Step 4: Setting Up the NVR
With your cameras in place, it’s time to configure the NVR. Begin by situating the unit in a safe and central location, preferably near your router for stable connectivity. Connect it to a monitor using HDMI or VGA cables to access the interface. Once powered on, link the NVR to your network via an Ethernet cable. This step ensures seamless communication between the cameras and the NVR.
Many systems, like those from LS VISION, offer mobile app integration, enabling you to monitor your property remotely from a smartphone or PC. You can also connect external storage devices or cloud services for enhanced backup options, ensuring your recordings are safe even in case of hardware failure.
Step 5: Configuring the System
Configuring your NVR is a straightforward but essential step. Access the system interface and create a strong password to secure your setup. Add cameras to the NVR, either automatically if they are pre-configured, or manually through the settings menu. Customize alerts and detection zones to suit your preferences.
Features like motion detection and AI-powered alerts can differentiate between human activity and other motions, reducing false alarms. Advanced NVRs allow you to set specific activity zones, ensuring you are only alerted for movement in critical areas. Tailoring these settings ensures your system works efficiently and provides accurate notifications when needed while minimizing unnecessary disruptions.
Step 6: Testing and Optimizing
Testing your setup is vital to ensure all components are functioning correctly. Check the live feed from each camera on the NVR monitor and any connected devices, such as a smartphone app. Simulate different events, like motion detection or line-crossing scenarios, to verify that alerts are sent as expected.
Adjust video quality, night vision, and detection zones to optimize the system’s performance. Fine-tuning the system not only enhances image clarity and responsiveness but also ensures a smooth user experience. Regular testing and maintenance, such as firmware updates for the NVR and cameras, will keep your system running efficiently for years to come.
Advantages of Using 4K Outdoor CCTV Cameras
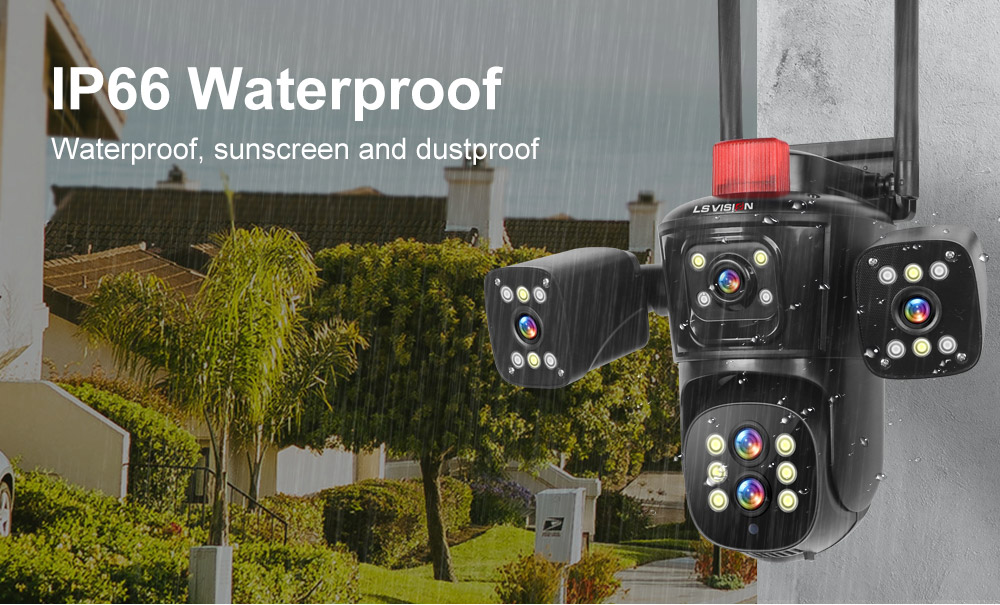
Investing in 4K CCTV cameras offers unmatched benefits. Their ultra-high resolution ensures detailed imaging, making it easier to identify faces and objects even from a distance. Features like infrared night vision provide reliable monitoring in low-light or no-light conditions, while IP66-rated durability ensures that the cameras perform well in harsh weather.
These cameras also integrate seamlessly with modern NVR systems, offering advanced features like real-time notifications and two-way audio. With the ability to store recordings in high quality, 4K cameras are ideal for both residential and commercial use, delivering an unmatched level of security and versatility.
Enhance Your Security Today
Setting up an NVR camera system with outdoor 4K CCTV cameras may initially seem challenging, but with careful planning and execution, it becomes a seamless process. From understanding your components to configuring your system and optimizing its features, each step brings you closer to a more secure home.
The advanced capabilities of systems like LS VISION make them a worthwhile investment, offering clarity, reliability, and peace of mind. Regular maintenance and updates will ensure your system remains effective and adaptable to evolving security needs.
If you’re ready to take your home security to the next level or need professional assistance, don’t hesitate to contact our team today. Our experts are here to guide you, answer your questions, and help you select the perfect security solution tailored to your needs.